


Before any work takes place you must ensure that proper care and attention is given to your safety and those around you.
Compatibility
Before anything else, check for compatibility and ensure your
hull can be successfully over-coated with the product you wish to use.
Most similar antifoul coatings are compatible and need nothing
more than a jet-wash and the removal or spot repair (also known as patch
priming) of any loose or flaking antifoul. Some existing coatings, however, may
require light wet-sanding of the film and others may require a barrier coat or
primer coat before proceeding.
Seajet publish their own compatibility guide which can be
viewed online at http://www.seajetpaint.com/en/products/anti-fouling-compatibility-chart/
but, if still in doubt, seek advice from the manufacturer before proceeding.
Quantity
Always ensure you have enough quantity to complete the job
with the required number of coats you need.
While your yacht is out of the water, it’s false economy to
scrimp on the coating so play safe and always ensure you have sufficient extra
quantity for areas of high erosion such as the bow, waterline and leading edges
of the keel and rudder.
The scientific approach is to divide the total surface area
of your hull by the coverage rate (m²/litre) of the relevant product and this will
tell you how many litres you require for one coat.
A formula for working out the surface area of the
underwater, freeboard and deck areas of your boat can be found at http://www.seajetpaint.com/en/paint-guide/how-much-paint-to-use/
Inspection and Removal
After lifting out and scrubbing off or jet-washing the
hull, a closer examination for damage and fouling attachment is worthwhile.
Grass, weed and loose paint should be removed using a scraper – with the sharp
corners rounded off with wet or dry paper, to avoid gouging the surface. Larger
areas can be dealt with by slurry blasting.
Barnacles may need more thorough treatment, as their cement
contains a hormone, which encourages young barnacle ‘Spat’ to settle nearby so,
after scraping, barnacle remains should be wet-sanded until they are no longer
visible.
Surface preparation
Surfaces to be painted must be clean, dry and free of oil
or grease. Bare surfaces must first be primed with a suitable priming scheme,
filling any undulations between coats with an epoxy profiling filler. Existing
antifoulings don’t usually need any special preparation, but they can be
lightly wet sanded, using fresh water, to remove small lumps and ‘blebs’ in the
paintwork.
Priming the underwater hull
On bare and filled areas, you should apply touch-ups of
primer to ensure good adhesion of the coats to follow. For hulls where all the
existing paint is removed and full coats of the primer system are required, use
a high performance epoxy primer, such as Seajet 117 or 118 Epoxy Primer. Be
sure to observe the over coating intervals between each coat – Seajet put this
information on the tin. Use a brush for smaller areas and a roller for larger
areas. If you don’t know what antifouling was last used on your boat, or the
condition of the substrate is not ideal, apply a good sealer coat like Seajet
011 Underwater Primer, for example.
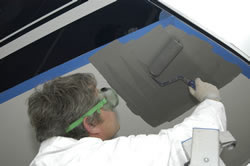
Applying anti-fouling
Generally speaking, the performance of antifoul is directly
proportional to the dry film thickness of each coat. Therefore, it is important
that you apply the recommended quantity as a minimum for a satisfactory result.
Where possible apply antifouling during late morning or
early afternoon in calm, dry weather. Avoid the risk of dampness or overnight dew,
as this will spoil the results and subsequently affect the performance. Apply
masking tape around the waterline and mask off anodes, shafts and fittings to
protect them from unwanted coating. Before you start put a plastic sheet down
to protect the ground and wet the ground with water to prevent dust rising.
If you are working on a cold day, keep your paint in a warm
place or stand the tin in a bucket, part filled with warm water. This will make
it easier to apply and give a smoother finish. Anti-foul can settle, so
vigorous stirring with a flat bladed knife is recommended. Don’t use paint
directly from the can; put an appropriate amount in a roller tray and replace
the lid. This prevents contamination and premature ageing of the main can
contents. Remember to occasionally stir-up the tray contents during your work.
Antifoul is best applied with a mohair roller, but keep a brush handy for those
awkward to reach areas.
When using a roller, apply the coating in a ‘criss-cross’
pattern, as if you were using a brush. This helps spread the coating evenly.
Alternatively, get someone else to follow you with a paint pad. Don’t work the
pad backwards or forwards, or try to spread it too thinly. Apply an extra coat on
the leading edges and waterline area, as this is where the boat faces more
water-flow. Finally, as soon as the anti-foul feels ‘tacky’ remove the masking
tape before the paint is allowed to dry.
Stand back and congratulate yourself on a job well done.
Antifouling for beginners – A ‘how to’ guide
A new Seajet DVD has been produced ‘How to Antifoul your
Boat’ is packed with tips and advice for beginners on how best to proceed. Ask
your local chandler for a copy, or view the film on the Seajet website at http://www.seajetpaint.com/en/home/